Core Tools for Installation
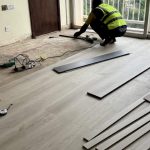
Installing laminate flooring yourself in Uganda can be a rewarding way to save on labor costs and add personal value to your home. The popular click-lock system makes it one of the more accessible DIY flooring projects. However, it requires physical effort, attention to detail, and a realistic understanding of the challenges posed by local conditions like humidity and uneven subfloors. This guide will walk you through the entire process, highlighting where you can succeed and where professional help is recommended.
Essential Tools and Materials You Will Need
Before purchasing your laminate, gather the right tools. Having these on hand will make the process smoother.
- Tape Measure & Pencil: For precise measurements and marking cuts.
- Utility Knife & Extra Blades: For scoring and cutting underlayment.
- Hand Saw, Jigsaw, or Circular Saw: A jigsaw is ideal for cutting planks and making intricate cuts around door frames. Ensure you have a fine-tooth blade for laminate to prevent chipping.
- Pull Bar and Tapping Block: Essential for locking the final planks in each row without damaging the edges.
- Spacers: Small plastic wedges to maintain the crucial expansion gap around the room's perimeter.
- Hammer: Used with the tapping block.
- Safety Gear: Safety glasses and ear protection (if using power saws).
Required Materials
- Laminate Planks: Purchase 10-15% more than your room's square footage to account for cuts and waste.
- Underlayment: A moisture-resistant foam underlayment is critical for Uganda. It provides cushioning, sound reduction, and a vapor barrier.
- Moisture Barrier (if needed): For ground-floor concrete slabs, a separate plastic sheeting (polyethene) may be required beneath the underlayment.
- Transition Strips & Molding: For doorways and to cover expansion gaps against walls.
Step-by-Step Installation Process
Follow these steps methodically to ensure a professional-looking and durable result.
Step 1: Preparation is Everything (The Most Important Step)
Proper prep can make or break your project. Do not rush this stage.
- Acclimatize the Planks: Bring all boxes of laminate into the room where they will be installed. Let them sit, unopened, for at least 48 hours. This allows the planks to adjust to the room's temperature and humidity, preventing major expansion or contraction after installation.
- Prepare the Subfloor: It must be clean, dry, and level.
- Concrete: Sweep and vacuum thoroughly. Check for moisture by taping a 1-foot square of plastic sheeting to the floor. If condensation forms under it after 24 hours, you have a moisture issue that must be addressed before proceeding.
- Existing Flooring (Tile, Vinyl): Ensure it is firmly attached and level. Any loose tiles must be fixed.
- Plan Your Layout: Decide which direction to lay the planks (usually parallel to the main light source). Plan to stagger end joints by at least 12 inches between rows for strength and aesthetics. Avoid small slivers of plank (less than 6 inches) at the start or end of rows.
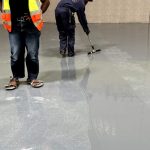
Step 2: Installing the Underlayment
Roll out the underlayment sheets perpendicular to the direction you will lay the laminate.
- Butt the seams together tightly but do not overlap them.
- Use duct tape to secure the seams, creating a continuous moisture barrier.
Step 3: Laying the First Rows
The first rows set the stage for the entire floor. Take your time here.
- Place spacers against the starting wall.
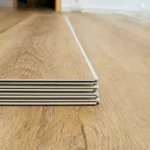
- Lay the first plank in the corner with the tongue side facing the wall.
- Connect the next plank in the row by angling it and clicking the end joints together.
- For the second row, start with a plank cut to at least one-third of its length to create the staggered pattern. Click the long edge of the plank into the first row before connecting the end joint.
Step 4: Continuing Across the Room
Work row by row across the room.
- Always use the tapping block against the plank's tongue when connecting the long sides. Never hammer directly on the plank edges.
- Use the pull bar to gently tap the final plank in a row into place.
- Remember to keep spacers against every wall.
Step 5: Dealing with Obstacles and Final Rows
This is where your skill with a jigsaw will be tested.
- Door Frames: Under-cut the door jamb so the laminate can slide underneath for a clean look. Use a handsaw or a specialized jamb saw.
- Pipes: Measure and drill a hole in the plank at least 10mm larger than the pipe diameter to allow for expansion.
- Final Row: You will likely need to rip-cut planks lengthwise to fit the remaining space. Measure the gap at multiple points, as walls are rarely perfectly straight.
Common Pitfalls to Avoid in Ugandan DIY Projects
Be aware of these frequent mistakes that can ruin your floor.
Ignoring Expansion Gaps
This is the number one error. Laminate needs room to expand with humidity. Never install it tight against a wall. Maintain a consistent 10-15mm gap (the width of your spacers) around all vertical obstacles, including walls, pipes, and cabinets. This gap will be hidden by skirting boards.
Poor Subfloor Preparation
Installing over a dirty, wet, or uneven subfloor will lead to squeaks, movement, and damaged locking systems. Any dip or hump greater than 3mm over a 1-meter span must be leveled using a self-leveling compound for concrete or plywood for wooden subfloors.
Incorrect Cutting and Forcing Planks
Using a dull blade or the wrong saw will chip the laminate's decorative surface. Never force a plank to click into place; if it doesn't fit easily, check for debris in the groove or an uneven subfloor beneath. Forcing it can break the locking mechanism.
When to Call a Professional
Know your limits. It is cost-effective and wise to call experts like Precision Flooring Uganda for:
- Extensive Subfloor Leveling: If your floor is severely uneven.
- Complex Large Areas: Very large rooms or open-plan spaces with multiple angles.
- Lack of Time or Confidence: If the project feels overwhelming, professional installation guarantees a warranty-backed result.
Final Checklist Before You Start
- Planks acclimatized for 48+ hours.
- Subfloor clean, dry, and level.
- All tools and materials purchased (plus extra planks).
- Layout planned with staggered joints.
- Expansion gap spacers ready.
By following this realistic guide, you can successfully learn how to install laminate flooring Uganda and enhance your home with your own hands. Remember, patience and preparation are your most valuable tools. For a flawless finish or complex projects, don't hesitate to contact the professionals at Precision Flooring Uganda for advice or a complete installation service.
Need Professional Flooring Services?
Get expert flooring solutions tailored to your specific needs. Explore our services or get a free quote today.
Transform Your Space Today
Don't wait to have the beautiful, durable floors you deserve. Our team of experts is ready to bring your vision to life with premium flooring solutions.
Get Your Free Consultation